Cursor · React · shadcn registry
How to add a ready-made React component in Cursor and keep its design
You found the right block and gave it to AI, but your project ended up with different fonts, spacing and behaviour. To keep the design you chose, give Cursor the component’s installation instructions, then ask for content changes separately. We will walk through that process with VibeUI’s faq-001 question-and-answer section.
VibeUI team ·

Before you start
Open your React project folder in Cursor. For this example, use Next.js with Tailwind CSS and a configured shadcn CLI. The project needs a components.json file. If you do not have a project yet, start with the VibeUI getting-started guide.
Use Agent mode: it needs to read files, edit the page and run terminal commands. Save the current working version of your project in Git before installing so you can review the changes and return to it if needed.
The catalog and previews are public. Copy for AI requires an account; the free allowance is 20 different components per month. See the PRO terms on the pricing page.
1. Choose a block and pin down its appearance
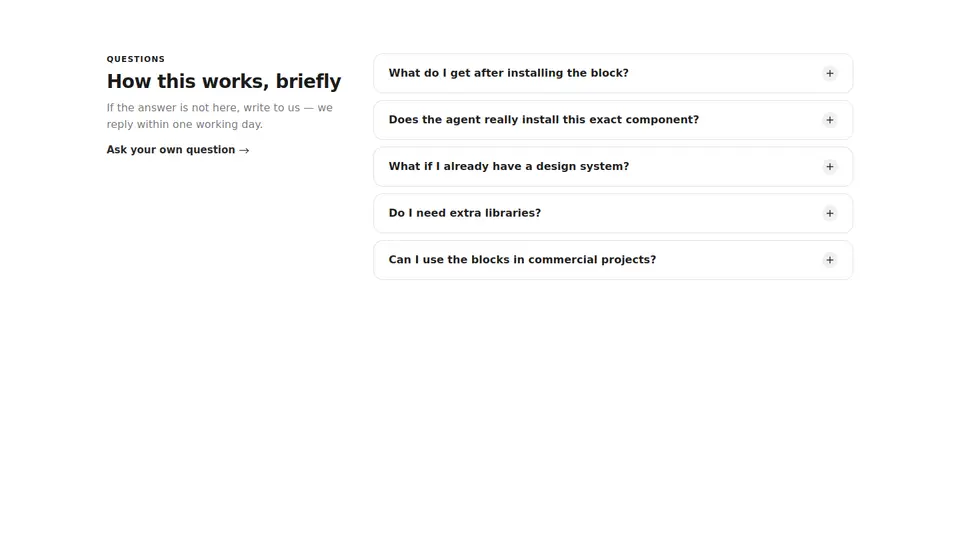
Open faq-001. The heading, description and contact link sit on the left, with expandable questions on the right. On narrow screens, the columns stack vertically. Open several answers: they should stay open independently. Choose the surface and finish changing the preview controls before copying; the selected values are passed to the agent through the link.
Keep the original copy for the first installation. This makes it easier to tell whether a difference comes from the component or from your later changes. A preview screenshot helps with comparison, but give the agent the instruction link for installation: an image alone does not contain files or dependencies.
2. Copy the link and give it to Cursor
Press “Copy for AI” on the block page. Your clipboard will contain a personal link that is valid for 30 minutes. Replace the angle-bracketed line in the task below with that link and send it to Cursor in your open project.
Add this FAQ block before the footer on the home page:
<paste a fresh Copy for AI link>

Open the link and follow its installation instructions. Use the actual VibeUI registry component and its dependencies. Keep the selected theme, native details/summary, independently expandable questions, typography, spacing and narrow-screen behaviour. First mount the original version without changing its copy. After installation, list the added files and show the page in the browser.Cursor should read the instructions, install the registry component and render it on the page. The shadcn CLI copies files into your project; there is no need to ask the agent to rewrite the source from a picture. If Cursor asks you to approve a command, check that it relates to the selected block and your project.
In VibeUI, a Copy for AI link points to the agent instructions. Do not pass it to npx shadcn add as though it were a registry JSON URL. For manual installation, open “Component source” and use the supplied command; see the installation guide.
3. Check the files and the browser result
Do not stop at the agent saying “done”. Review the changed files. The faq-001 block uses three other VibeUI components: heading-001, accordion-002 and button-077. With the registry’s target paths, the file set looks like this:
components/vibeui/faq-001.tsx
components/vibeui/heading-001.tsx
components/vibeui/accordion-002.tsx
components/vibeui/button-077.tsx
If your project uses different paths, check its components.json and actual imports. What matters is that the component and all its dependencies are present. Then ask Cursor to start the development server and open the page.
- Compare the selected theme, heading, text width, question cards and spacing with the preview.
- Open two answers in succession and check that the first stays open. Tab to a question and expand it with Enter or Space.
- Narrow the viewport to around 390 px, then return to desktop. The columns should stack vertically and answer text should fit without horizontal scrolling.
- Check the contact link. The demo uses #contact; replace it with a real address or an existing section anchor before publishing.
4. Change the content in a separate step
Once the original appearance matches, change copy, links and colours through props. In faq-001, these include title, description, items, contactLabel, contactHref and accent. The marker prop selects the indicator; elevation controls the expanded card styling. Start by replacing one question and answer, then check the expanded card on a phone.
The example below assumes that a contacts section already exists. Supply your own copy and the real button destination.
Adapt the installed Faq001 to my project. Title: “Before you start”. Description: “Answers to common questions”. Pass my question/answer objects to items: ask me for the questions and answers first, without inventing product terms. The link below the heading should use contactLabel="Contact us" and contactHref="#contacts". A section with id="contacts" already exists lower on the page.

Change the data through props where the component is rendered. Keep two columns on wide screens and one on narrow screens, native details/summary, independently expandable questions, type sizes and spacing.A longer headline can take more lines even when the component is unchanged. Shorten the copy first and check it on a phone. Asking for a complete redesign to make it fit mixes content adaptation with design changes and makes comparison harder.
If something goes wrong
- Cursor cannot open the link
- Expand “Show the full instructions” on the block page and paste the complete text into the agent chat. Use fresh instructions: the links inside them also expire.
- Installation returns 401
- Return to VibeUI, check that you are signed in and obtain a new link. Do not use a bare /r/pro/faq-001.json URL without its signature. If you cannot obtain a fresh link, check your account access and limits.
- The agent recreated a similar block
- Ask for the install command, its output and the added files. If no installation occurred, return to your saved version or review the diff, then repeat the task with the full instructions. A claim that the design was preserved does not establish that the original component was used.
- The files are present, but the appearance differs
- Check the surrounding color-scheme, prop values and container width. Faq001 has no tone prop: its theme follows the surrounding page. Check whether global CSS overrides headings, links or backgrounds. Identify the specific difference before asking for changes.
Try it in your own project
Start with faq-001: install the original version, check it, then change the content. Once that workflow works, choose your next block.